Burning Man Preparation & Thriving Tips
Tip #1:
We do tend to consume a lot in prepping for and going to Burning Man. So, to assist with waste management, please unpackage anything you bought newly that has packaging that you are going to throw away, or better, recycle. This way it can be put in the proper bin before you go to the playa, and it doesn't wind up in our garbage/recycling cans in camp, conserving space and weight overall. Use zip lock bags that can be washed and reused to contain anything that you unpackaged that needs containment or protection from the elements, including food items. Happy Green Camp Manifestation!Tip #2:
Costco has packages of batteries for about $13 for 50 (AA’s). This is far cheaper than anywhere I have found. Or, even better, spend some extra money and stock up on a lifetime supply of rechargeable batteries which you'll never have to buy again and won't go in the landfill! Amazon sells them cheap-ish!Tip #3
If you are sleeping on an air mattress, it is essential that you get a wool blanket, army style is good, to put on top of the air mattress under your sheet that you sleep on top of. This will insulate you from the cold air that will come from under you inside the mattress. Believe me, I've done it both ways and it was a very, very cold, sleepless, uncomfortable night without the wool blanket. Never again! Friends don't let friends air mattress sleep without wool!Tip #4
Coolers and dry ice - though it is a bit more expensive, here is a tip for managing your cooler a bit differently which will have you not have to buy any or much regular ice.- Freeze about 30 single serving water bottles ahead of time (at least 2 days).
- Then fill one medium to large size cooler with dry ice (costs about $50-$60) about 2/3 full. You can get dry ice at various markets like Lucky or liquor stores. There is a rush for this stuff around Burning Man time.
- Put in 15 of frozen the water bottles on top of the dry ice.
- Once your dry ice cooler is filled don't open it or leave it in the sun. If you do this, you may even find that it is so cold that it is slightly frosted over and stuck to the bottom of your car upon arrival to the playa.
- Then fill another cooler with your perishable food and the 15 remaining frozen bottles, distributed throughout with a good amount lining the bottom.
- About 2 or 3 days in, the frozen bottles in your food cooler will have started to melt.
- Open your dry ice cooler and swap the 15 fully frozen bottles in there (cuz they will be fully frozen still) with the partially melted ones in your food cooler.
- Repeat! - every 2-3 days until your dry ice is gone. Where did it go?
- If you are on the playa for less than 6 or 7 days, it’s conceivable, if you do this well, that you would never have to get and buy ice nor drain melted ice water from your food cooler (chores!).
- It's been tested and achieved and even food was brought home uneaten, still good and not water logged!
Tip #5
More playa wisdom… Light your bike! You can get simple strings of battery powered, little, led lights of all shapes and colors on-line for like $5 each. One strand can spiral up and down your bike to cover almost all of it. Usually, they only take 2-4 AA batteries. Do it and don't be a dark-tard! We want you to honor the first rule on the playa…don’t break your pretty face! And leave some time for shipping – only -1245 days left! Huh?!Tip #6
More cooler wisdom… Put all vegis that go in your cooler in zip lock bags. You wouldn't necessarily think this was needed, but have you ever seen what a cucumber does when sitting in water for just a while? It's not pretty! So, basically, bagging anything and everything that is open, including vegis is just a good idea for your cooler water and the longevity of the items themselves! Who wants to dig out rotting food out of their cooler on the playa? Yuk!Tip #7
Rebar and Shade StructuresNOTE: THIS TIP IS FOR THOSE WHO LIKE POUNDING REBAR. WE DON'T USE THEM ANYMORE FOR THE CAMP INFRASTRUCTURE CUZ ITS JUST TOO MUCH DAMN WORK AND THERE IS A BETTER WAY. IF YOU WANT TO KNOW ABOUT THAT BETTER WAY, SKIP THIS TIP AND GO TO TIP #8!!
- Shade structures are essential. When the sun comes up in the morning (and often you might just be rolling in to go to bed) tents start to cook. A shade structure will make your personal dwelling a place you feel comfortable going at any time instead of dreading. You can always take respite in the communal structures, but you want your personal space to be available as you wish.
- Make sure your shade structure is sturdy. A lot of structures that you buy from a store are pretty flimsy. Winds get strong at times there and you don’t want that structure to crumble.
- Make sure your shade structure is either UV protected, reflective or dark to keep morning light out, or all of the above.
- Get better rope than the rope that normally comes with store bought shade structures. Doesn’t have to be real thick. This should be good. One 100 ft length should be good, two to be safe.
- Yurts, tents, shade structure and anything that needs tethering should be done with rebar stakes, not the normal tent stakes. Basically, you need to create your own candy-caned stakes out of 3/8” x 1.5’ rebar. Mallets for pounding and benders are provided, though I recommend doing the bending before you get there (which you could do at my house if desired and accessible).
Tip #8
Lag Screws and Shade Structures- Shade structures are essential. When the sun comes up in the morning (and often you might just be rolling in to go to bed) tents start to cook. A shade structure will make your personal dwelling a place you feel comfortable going at any time instead of dreading. You can always take respite in the communal structures, but you want your personal space to be available as you wish.
- Make sure your shade structure is sturdy. A lot of structures that you buy from a store are pretty flimsy. Winds get strong at times there and you don't want that structure to crumble.
- Make sure your shade structure is either UV protected, reflective or dark to keep morning light out, or all of the above.
- Get better rope than the rope that normally comes with store bought shade structures. Doesn’t have to be real thick. This should be good. One 100 ft length should be good, two to be safe.
- Yurts, tents, shade structure and anything that needs tethering should be done with lag screws, not the normal tent stakes.
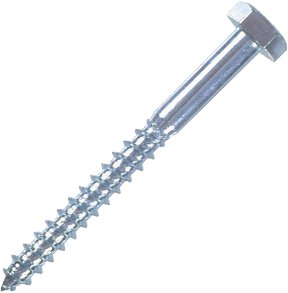
- We took on using lag screws a few years ago for the camp infrastructure and it makes a huge difference in the amount of labor we have to do to set up and tear down camp. This is a compete replacement for rebar. These lag screws are long screws with a hex head that we actually drill into the playa with an impact driver and a socket bit, instead of pounding in rebar, to secure anything and everything that needs tethering. Then when we need to remove them at strike, we just drill them out. No tugging and digging out rebar. Its revolutionary!! We use them for the main communal structure and literally everything else, yurts, tents, shade structures, signs, etc. So, you can use these too, unless you like pounding rebar, then have at it.
- What you need are 3/8” 14” lag screws. You’ll need one to replace each piece of rebar that you would use.
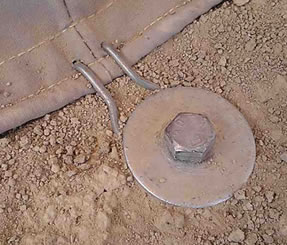
- If you are using them to replace rebar that would be holding down a tent tethering loop, you’ll also want a wide washer to widen the amount of material that comes in contact with the tent loop and sandwiches the loop between the screw head/washer and the ground. You can get the washers at Home Depot.
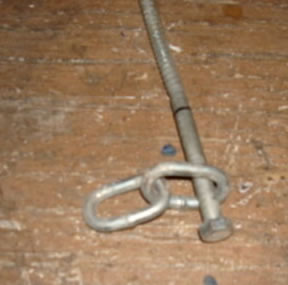
- If you are using them to tether a post or a shade structure upright of some sort, you’ll want to attach a piece of chain link, 2 links long, one to attach to the screw head, and the other to be the loop through which your rope or strap attaches. No washer needed (and recommended to not use a washer cuz they will bend and flake metal moop – no!!!). Make sure to get the correct size chain so the screw head does not go through the chain link. You’ll have to buy a length of chain and cut them yourself. You can get this at Home Depot.
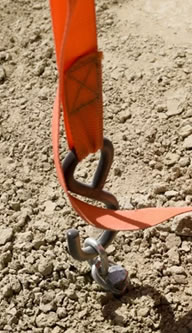
- Here is where you can buy them:
At the site linked below (I’ve ordered from them before), you can buy them only 50 at a time, which may be more than you need (though you could gift the extras to other camp members if you have the means, or team up on the purchase): https://www.fastenersuperstore.com/products/476110/lag-screws?pid=17302&gclid=Cj0KCQjwqPDaBRC6ARIsACAf4hC-mXyly-iQKPhG5bSw462GHGxVkla63IXwg1ocYiQpTVcnk7Eia5QaAukNEALw_wcB - All camp tools will be accessible to camp members, including impact drivers to drill these puppies in and out (as well as mallets/sledge hammers should you still decide to use rebar). We will have a small supply of extra screws and chain links for those in need, but please heed the Burning Man tenant of radical self-reliance!!
Tip #9
Handi-wipes (or WetOnes or baby wipes)!!- Get the tubs of them for your living quarters and the small travel packs for your survival bag. You never know when you’ll touch something icky or get some playa where you don’t want it and you’ll be glad you have a wet cloth to clean yourself up!! Get the disinfecting kind and you’re even better off. You’ll also want these for giving yourself a nice wipe-down before bed.
Tip #10
Coconut Water!!!- Very hydrating and tasty too! Get cans of them so they can be crushed and recycled. I recommend Amy and Brian’s brand or C2O brand, but you find one you like!! So good out on the playa after sitting in ice!!


